GTA Direct Windows & Doors Shares Step-by-Step Guide to Replacing Broken Window Panes Safely
Replacing a broken window pane or glass insert in your door doesn’t have to be scary or expensive. With the right tools and a bit of patience, you can fix it yourself and save money on repairs. Whether it’s a small crack or a completely shattered pane, this guide will walk you through every step clearly and safely.
Before you start, it’s important to understand the basics of handling glass and preparing your windows and doors Toronto. This ensures the new pane fits perfectly and stays secure. Let’s get ready to replace that broken glass and bring your door back to life.
Assessing the Damage and Gathering Tools

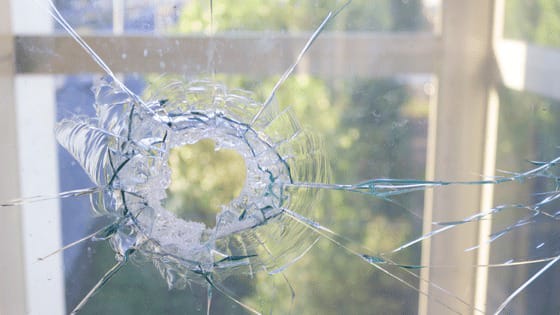
When it comes to replacing a broken window pane or glass insert in a door, the first step is assessing the damage. This is important because it helps you understand how much work is involved and what tools you’ll need. Before you dive into the repair, take a careful look at the broken glass and evaluate how severe the damage is.
Inspecting the Broken Glass
Start by looking closely at the broken window pane. Is the glass cracked or completely shattered? A small crack may be easier to handle and repair, but a completely shattered pane will require extra care. If the glass is just cracked, you might be able to remove and replace it with minimal effort. On the other hand, shattered glass will likely need to be cleared carefully, so you don’t risk injury.
Once you have an idea of the damage, check the door frame to make sure it’s still intact. Sometimes, the impact from a broken pane can also damage the frame or trim. If the frame is compromised, it may require extra work or replacement.
Gathering the Right Tools
Once you’ve assessed the damage, it’s time to gather your tools. To replace a broken window pane or glass insert, you’ll need a few essential items. You’ll require safety gloves to protect your hands from sharp edges, as well as safety goggles to protect your eyes from flying glass during the removal process. A putty knife will come in handy for removing old sealant or glazing, while a hammer or rubber mallet will help loosen stubborn pieces of glass.
You’ll also need a replacement glass pane that matches the size and type of your door. Measure the frame carefully to ensure you purchase the correct size. Lastly, have some fresh glazing compound or weather sealant on hand to secure the new glass properly.
Removing the Broken Glass Pane
Once you’ve assessed the damage and gathered your tools, it’s time to tackle the actual removal of the broken glass pane. This step requires patience and attention to safety, as handling glass shards can be tricky. But don’t worry; by following the right steps, you’ll be able to safely remove the broken pane and prepare for the new one.
Safety First: Protect Yourself
Before you start, make sure to wear safety gloves and goggles. Glass can be unpredictable, and shards may fly in all directions during the removal process. Protecting your hands and eyes is crucial to avoid injuries. You might also want to lay down a thick towel or a plastic sheet around the door area to catch any falling glass shards. This will help contain the mess and make cleanup easier.
Removing the Broken Glass Carefully
To remove the broken glass, start by using a putty knife or flathead screwdriver to gently pry off any old glazing or sealant holding the glass in place. If the glass is in a wooden door, there may be small glazing points (metal clips) that secure the glass. Use your tool to carefully loosen and remove these clips, one by one. If the glass is in a metal door, the process may be a bit different, and you might need to remove screws or bolts.
Once the glazing or clips are removed, carefully push the broken glass pieces out of the frame. Be sure to handle each piece gently, even if it’s shattered. If the glass is in larger pieces, you may be able to remove them whole. If it’s shattered into smaller shards, pick them up carefully using pliers or a cloth to avoid direct contact with the glass.
Cleaning Up
After removing the broken glass, check the door frame for any remaining shards. Use a broom and dustpan to sweep up any larger pieces, and then wipe down the frame with a damp cloth to remove any small fragments. This ensures the frame is completely clean and ready for the new glass to be installed.
Preparing the Door for the New Glass Insert
Now that you’ve successfully removed the broken glass, the next crucial step is preparing the door for the new glass insert. This part of the process ensures that the replacement glass will fit perfectly and stay secure. A clean and smooth surface is key to a proper installation, so take your time with these preparation steps.
Clean the Door Frame
Start by cleaning the door frame thoroughly. Any dust, dirt, or old glazing materials left behind can affect how well the new glass will fit and stay in place. Use a putty knife or a scraper to remove any old sealant or debris from the frame. Be gentle, but firm enough to clear away any remnants without damaging the wood or metal of the door.
Next, wipe down the frame with a damp cloth to remove any small particles. If the frame is wooden, make sure it’s completely dry before proceeding to the next step. If you skip this cleaning step, you could end up with gaps between the glass and frame, allowing drafts or moisture to seep in.
Measure the Frame Accurately
Accurate measurements are essential when preparing for the new glass insert. Use a tape measure to measure the height and width of the door frame where the glass will go. Be sure to measure in several places, as frames are sometimes slightly out of square. It’s always best to take the smallest measurement to ensure the glass will fit securely without being too tight.
If you’re replacing a broken glass pane in a door with a specific frame size (e.g., a pre-made door insert), it’s important to purchase the correct replacement glass. Many hardware stores can cut glass to size if you bring in your measurements.
Remove Old Glazing and Sealant
Before you can install the new glass, you need to remove any old glazing compound or sealant that may still be in place. This material was likely used to secure the old glass. Use your putty knife to gently scrape it off, being careful not to damage the door frame. If there’s any stubborn residue, you can apply a solvent to soften it and make it easier to remove.
Once the frame is clean, dry, and free from old materials, it’s ready for the new glass insert.
By carefully cleaning the door frame and measuring it accurately, you’ll ensure that the new glass will fit snugly and be properly secured. This step may seem small, but it’s key to the overall success of the replacement process.
Installing the New Window Pane or Glass Insert
Now that your door frame is clean and prepped, it’s time to install the new window pane or glass insert. This step is where all your careful measuring and preparation pay off. Take your time, follow these steps, and you’ll have your door looking great again in no time.
Positioning the New Glass
Start by carefully placing the new glass pane into the door frame. Make sure you handle the glass gently and wear your gloves to avoid cuts. Slowly lower the glass into the frame, checking that it fits snugly without forcing it. If the glass feels too tight, double-check your measurements to avoid damaging the pane or frame.
Securing the Glass Pane
Once the glass is properly positioned, it needs to be held securely in place. Depending on your door type, this usually involves using glazing points, metal clips, or small nails. Press these carefully along the edges of the glass to hold it firmly without putting too much pressure on the glass itself.
If your door uses glazing points, push them gently into the frame, spaced evenly around the glass. For metal clips or screws, follow the door manufacturer’s instructions to make sure the glass stays secure.
Applying Glazing or Sealant
The final step in securing your new glass is applying fresh glazing compound or weather sealant around the edges. This seals the glass to the door frame, preventing air or water leaks. Use a putty knife to smooth the glazing evenly, filling any gaps between the glass and frame. If you’re using a silicone sealant, apply a thin bead and smooth it with your finger or a tool.
Final Check and Cleanup
After the sealant or glazing is applied, let it dry according to the product instructions. While drying, avoid touching or moving the glass. Once fully set, clean off any fingerprints or smudges with a glass cleaner and soft cloth.
Conclusion
Replacing a broken window pane or glass insert in a door is simple when you follow the right steps. With safety and care, you can restore your door’s look and function without hassle. Grab your tools, follow the guide, and enjoy the satisfaction of a job well done.
Media Contact
Company Name: GTA Direct Windows
Contact Person: Alex Razimor
Email: Send Email
City: Toronto
Country: Canada
Website: https://gtadirectwindowsdoors.ca/