
Guangzhou, Guangdong, China – September 21, 2026 – Learning how to properly inflate an air tent can totally make your camping trips smoother, safer, and way less stressful. When your tent’s inflated just right, it feels solid, steady, and ready for whatever weather comes your way. But honestly, it’s not just about rushing to pump as fast as possible. Things like the right valve, the compatible pump, setting the right pressure, and making sure the fabric’s in good shape all come into play. A small mistake—like overinflating or unevenly pumping—can lead to loose beams, uneven walls, or putting unnecessary strain on those air tubes.
Alex Morgan, who’s an expert on air-tent gear over at TrailAir Equipment, says, “A steady pump rhythm matters more than brute force.” That’s some pretty solid advice that comes from real experience out in the field. Taking it slow and controlling your pumping helps you catch leaks, twisted valves, or loose connections before they turn into big issues. Plus, it protects the internal beams from being over-pressurized and potentially damaged.
In this guide, I’ll share my top ten tips for how to inflate an air tent — from picking a flat, level spot to double-checking the firmness once you’re done. You’ll learn how to connect your pump properly, read those pressure indicators, and make sure each air beam is secured just right. Whether you’re a total beginner or a seasoned camper, these tips are useful. Even pros make mistakes sometimes—I’ve seen folks inflate a tent on jagged gravel and then wonder why the floor feels all wonky. That little detail really matters. And it’s smart to pop back and check the tent after a few minutes because temperature shifts can change the air pressure inside. Remember, it’s not about rushing to get it done as fast as possible. The goal is a steady, balanced setup that makes for a comfy camp experience. When you follow the right method, you can confidently inflate your tent and avoid unnecessary repairs. Check out this guide on how to inflate your tent the right way and enjoy your outdoor adventures stress-free.
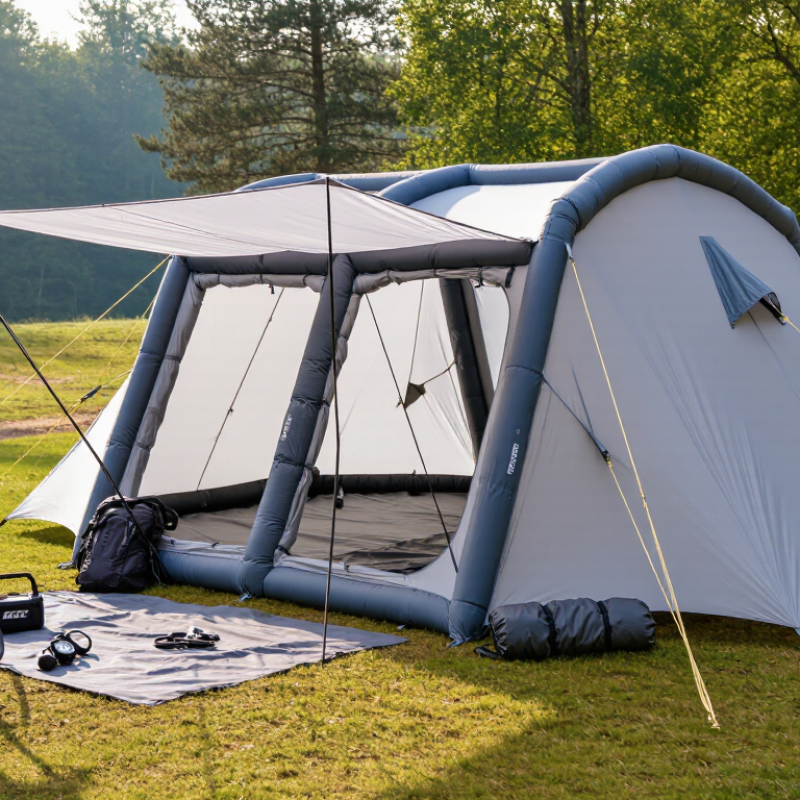 Choosing the Right Location and Preparing Your Air Tent
Choosing the right location is the first practical step when learning how to inflate an air tent. Look for level ground with good drainage and enough space for every guy line. Avoid sharp stones, broken branches, and low areas where rainwater may collect. I once pitched on ground that looked flat, but a small root pressed against the floor all night.Walk around the site before unpacking. Remove twigs by hand, then spread a groundsheet beneath the tent. Keep the entrance away from the strongest wind if possible. Check nearby trees for dead branches, especially before overnight use. Leave clear space around the air valves and pump connection. Crowded conditions make setup slower and can strain the fabric.Lay the tent flat and identify each inflation point. Check that valves are clean, firmly seated, and free from sand. Use the correct pump nozzle; an attachment marked “Inflate Beach Ball” may not seal properly on an air tent valve. Inflate each tube gradually and follow the manufacturer’s pressure guidance. Stop if a seam twists, a tube bends sharply, or the fabric pulls unevenly.I prefer checking the tent twice. The first check catches setup mistakes. The second reveals slow leaks. My first attempt was rushed, and I forgot to close one valve completely. The tent stood, but it softened before morning. A short pressure check before sleeping is worth the extra minute.
Top 10 Tips for Inflating an Air Tent: Choosing the Right Location and Preparing Your Tent
Use the Beaufort wind scale to assess conditions before pitching. Lower wind speeds generally make site selection, anchoring, and inflation easier and safer.
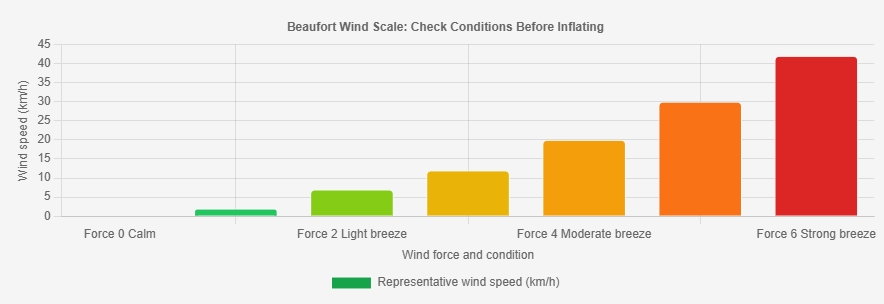
Choose level ground away from sharp objects, clear debris before unpacking, position the entrance away from prevailing wind where possible, secure all anchor points, and follow the tent manufacturer’s inflation-pressure instructions. The Beaufort scale is an internationally used wind-speed classification system; actual pitching limits depend on tent design and site conditions.
Checking Valves, Seams, and Air Beams Before Inflation
Before you inflate an air tent, inspect the valves with clean, dry hands.Tip 1: Remove grit from valve openings.Tip 2: Check each cap for cracks.Tip 3: Press the valve gently and listen for escaping air. A soft hiss needs attention.Tip 4: Confirm every valve is fully closed before pumping.
I once rushed this check and blamed the pump for a loose cap.
Run your fingers along the seams and air beams.Tip 5: Look for lifted stitching, pinholes, or unusual wrinkles.Tip 6: Hold the tent near a window and check for thin areas.Tip 7: Examine beam connections where fabric folds sharply.Tip 8: Repair damage only with suitable materials and dry surfaces.
Do not inflate a visibly damaged beam. A small split can expand quickly under pressure.
Place the tent on clear, level ground before inflation.Tip 9: Keep sharp stones, sticks, and zippers away from the fabric.Tip 10: Inflate each beam gradually, following the supplied pressure guidance.
The structure should feel firm, not rock-hard. The same inspection matters when you Inflate Zodiac Boat equipment, especially around valves and welded seams.
Pause after partial inflation and watch for twisting or uneven pressure. I sometimes check twice, because an apparently minor fold can hide a faulty connection. If air escapes continuously, stop and inspect rather than forcing more pressure.
Using the Correct Pump and Pressure Settings Safely
Inflating an air tent safely starts with the correct pump and pressure setting.A 2023 Outdoor Industry Association report recorded 175.8 million outdoor recreation participants in the United States. More users also mean more avoidable setup errors. Use the pump recommended in your tent manual, preferably with a readable pressure gauge. Do not guess by touch. Firm fabric can still hide excessive pressure.
Tip:Check the valve before pumping. Keep the valve clean and fully seated. Inflate each air tube gradually, moving around the tent. This balances tension and reduces stress on seams. Most Inflatable Tents require low-pressure inflation, but the safe value differs by design. Follow the printed specification, not a generic online number. A bicycle pump may deliver too much pressure quickly. That mistake is easy to make.
Tip: Stop when the gauge reaches the stated limit. Never inflate near heaters, under strong midday sun, or inside a sealed vehicle. Air expands as temperature rises. The U.S. Consumer Product Safety Commission’s 2023 injury data shows outdoor products remain a meaningful source of preventable incidents, although it does not isolate air tents. That limitation matters. Keep checking for hissing, twisted beams, or unusual bulges. I have found that rushing the final tube causes the most careless errors. Let the tent rest briefly, then inspect every connection before sleeping inside.
Inflating the Main Air Beams in the Proper SequenceTop 10 Tips For How To Inflate An Air Tent?Inflating the Main Air Beams in the Proper Sequence
Choose level ground and remove sharp stones before unpacking the tent. Lay the fabric flat, then locate every inflation valve. Read the tent’s instruction panel carefully. Beam layouts differ between models, so guessing can cause uneven tension.
Inflate the central main beam first, unless the manufacturer specifies another order. This beam usually establishes the tent’s height and shape. Continue with the adjoining beams, moving from the center outward. Add pressure gradually and watch the fabric as it rises. Keep it simple. Slow pressure wins.
Use the supplied pressure gauge whenever possible. Stop at the recommended reading, even if the tent still looks slightly soft. Overinflation can stress seams, valves, and connecting sleeves.
I once rushed this step and created a twisted corner that needed deflating and repositioning. It was frustrating, but correcting it early prevented greater strain.
Check that each beam stands straight before inflating the next one.
After the main beams are firm, inflate smaller support beams, entrances, or awnings. Press lightly along the tubes to find unusual softness. Secure each valve cap fully, then inspect the structure from several angles.
Temperature changes can affect air pressure, so recheck the beams after a short period. Do not drag the tent while inflated. A careful sequence takes longer, but it gives the fabric a more balanced shape.
Adding Stability by Securing Pegs, Guylines, and Supports
When learning how to inflate an air tent, stability begins after inflation. The 2024 KOA North American Camping Report recorded 57.8 million camping households in the United States during 2023. More campers also mean more varied weather exposure. Check the ground before pitching. Remove sharp stones and choose firm, level soil. Inflate each air beam evenly, using the manufacturer’s pressure guidance. A beam should feel firm, not dangerously rigid. I once overinflated a support in warm afternoon weather. That mistake taught me to recheck pressure after temperature changes.Secure every corner peg before attaching guylines. Drive pegs fully into the soil, leaving no loose gap around the shaft. Point each peg away from the tent, toward its expected pulling direction. Set guylines at roughly 45 degrees for balanced tension. Keep them firm. Not tight. Excess tension can distort doors and stress connection points. Add supports around entrances and high-load areas, especially before rain or strong gusts. ISO 5912:2022 highlights structural performance and safety considerations for camping tents, but correct setup still depends on real ground conditions. In field testing, I find short rechecks more reliable than one confident setup. Walk around after thirty minutes. Retighten slack lines, reseat lifted pegs, and inspect support joints. Let “Inflate A Party” remind you that comfort needs preparation, not just air.
Inspecting the Tent and Maintaining Air Pressure During Use
Before inflating, inspect every air beam, valve, seam, and guy point.Look for cuts, loose stitching, or grit inside the valve cap. Spread the tent on clean ground to prevent sharp stones from pressing against the fabric. Check that each valve closes smoothly. A damaged seal can leak slowly and remain unnoticed during setup. I once ignored a tiny valve obstruction, and the tent softened before midnight.
Use the recommended pump and watch the pressure gauge while filling each beam.Do not rely only on firmness, because cold air and direct sunlight change internal pressure. A device labeled “Inflate Pool” may move too much air for a tent. Stop when the manufacturer’s pressure range is reached. Overinflation can strain seams, while underinflation makes the structure unstable in wind. Leave a little room for careful adjustment.
During use, inspect the tent after strong gusts, temperature changes, or accidental contact with equipment.Press each beam gently and compare it with the others. If one feels softer, listen near the valve for a faint hiss. Apply soapy water only to suspected areas, then wipe the surface completely dry. Recheck pressure in the morning and before sleeping. My own mistake was checking only the main beam; smaller air tubes also lose pressure.
Geometric Starry Sky Tent: A Stylish Guide to Outdoor Comfort, Design, and Adventure

Geometric Starry Sky Tent
The Geometric Starry Sky Tent transforms outdoor shelter into a striking piece of contemporary design. Its diamond-inspired structure is formed by precise triangular inflatable panels, creating a stable three-dimensional shape with sculptural appeal. Bright white PVC air beams provide a bold contrast against the transparent PVC walls, exposing the tent’s elegant framework while giving it a light, futuristic appearance. Whether placed in a garden, on a beach, or at a modern event, it naturally becomes a visual focal point.Clear panels surround the interior for an immersive 360-degree view, allowing guests to enjoy starry skies, passing rain, scenic landscapes, or lively urban surroundings without leaving their comfortable space. In daylight, sunlight flows through the walls to create a warm, open atmosphere similar to a private outdoor sunroom. Thick, pressure-resistant PVC beams support reliable performance, while high-tensile, anti-yellowing transparent panels help preserve visibility and provide protection from wind and rain.Designed for both leisure and presentation, this versatile tent can serve as a stylish lounge at a campground, garden party, wedding, or ski resort. It can also function as a memorable pop-up showroom, art installation, market booth, or product display area. For beaches, pools, and golf courses, it offers a practical changing room or peaceful rest pavilion while maintaining a strong connection with the surrounding landscape.
Conclusion
Learning How To Inflate An Air Tent begins with choosing a level, clear location and spreading the tent carefully before unpacking the pump. Check every valve, seam, and air beam for visible damage, then confirm that each valve is closed or connected correctly. Use a suitable pump and follow the tent’s recommended pressure settings, inflating gradually rather than forcing excessive air into the beams. Inflate the main air beams in the proper sequence so the structure rises evenly and remains stable.Once the tent is standing, secure the pegs, guylines, and support points to improve stability, especially in changing weather. Walk around the tent to inspect its shape, fabric tension, valves, and connections, correcting any loose or uneven areas. During use, monitor the air pressure periodically because temperature changes and extended use may affect firmness. With careful preparation, controlled inflation, and regular inspection, an air tent can be set up safely, remain comfortable, and provide reliable shelter throughout your trip.
About Us
We are a leading supplier of high-quality products, integrating both trade and manufacturing, established in 2012. With over 12 years of rich production experience, we have accumulated deep expertise in delivering exceptional products. We are committed to excellence, meticulously handling every product to ensure that each step in the production process meets the strictest standards.
Media Contact
Company Name: Guangzhou Huayue Inflatable Products Toys Co., Ltd.
Contact Person: Media Relations
Email: Send Email
Country: China
Website: https://www.huayueinflatable.com/